Odoo UI Design Kit User Manual
AI Chat Modification Features
Odoo UI Design Kit allows users to modify form layouts and table components through natural-language instructions. Enter a request in the chat panel, review the generated change, and decide whether to accept it or refine the requirement.
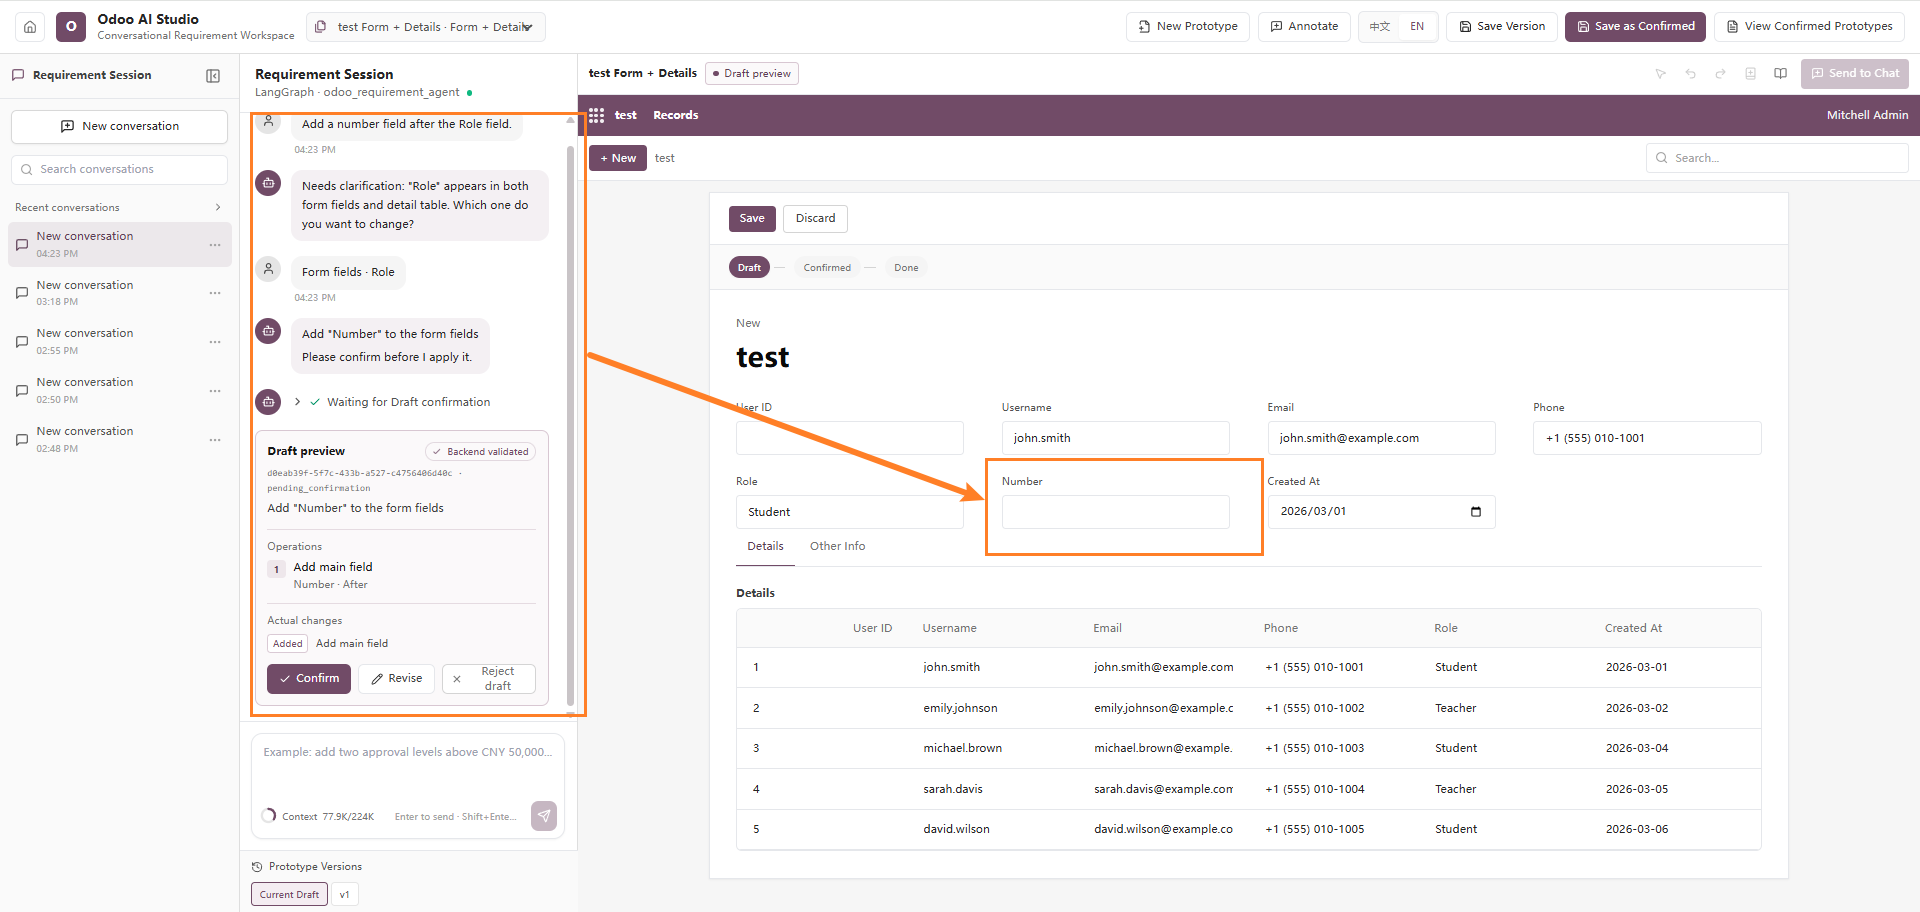
1. Add a Numeric Field
Description
Add a field for storing numerical business data, such as quantities, scores, amounts, or values used in statistical analysis.
The new field is automatically inserted at the specified position and follows the style, spacing, and layout of the existing form fields.
Example Prompt
Add a numeric field after the Role field.
Screenshot
2. Add a Button
Description
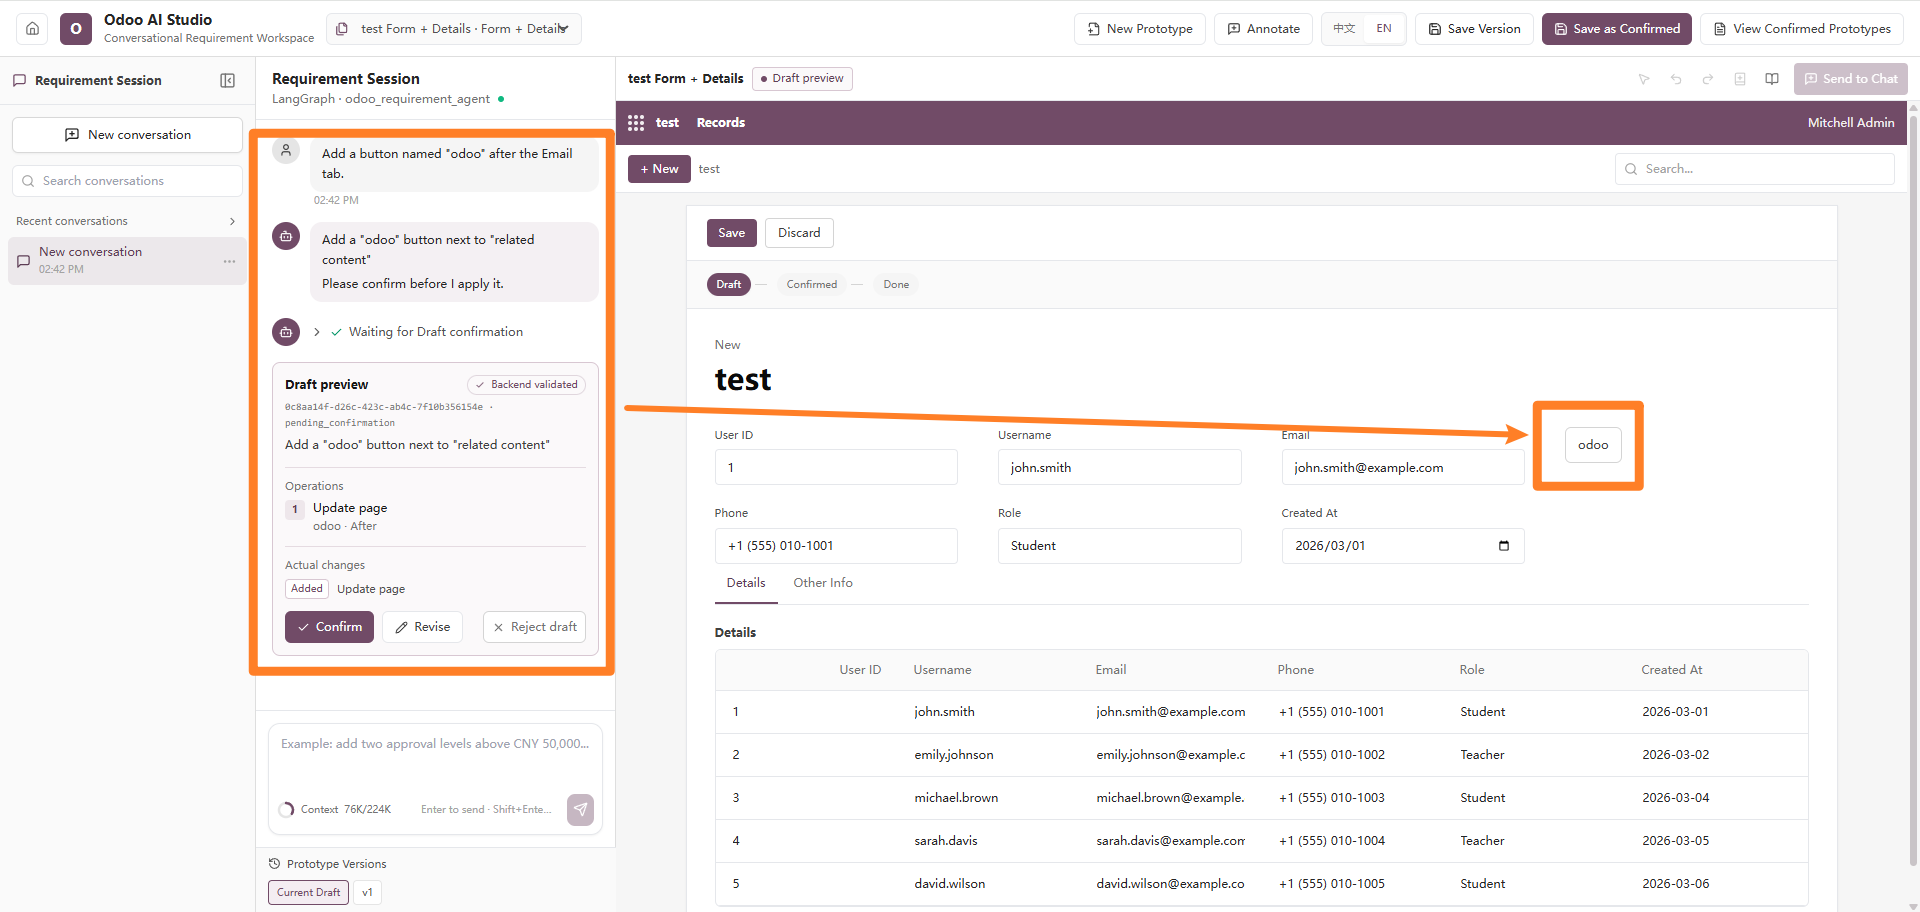
Add a custom button to the current form or tab. The button can later be connected to a business action, workflow, automation, or extension function.
When creating the button, clearly specify:
- The button label
- The button position
- The expected action when the button is clicked
Defining these details in the prototype helps developers bind the correct business logic during implementation.
Example Prompt
Add a button named Odoo after the Email field.
Screenshot
3. Review and Refine a Modification
Description
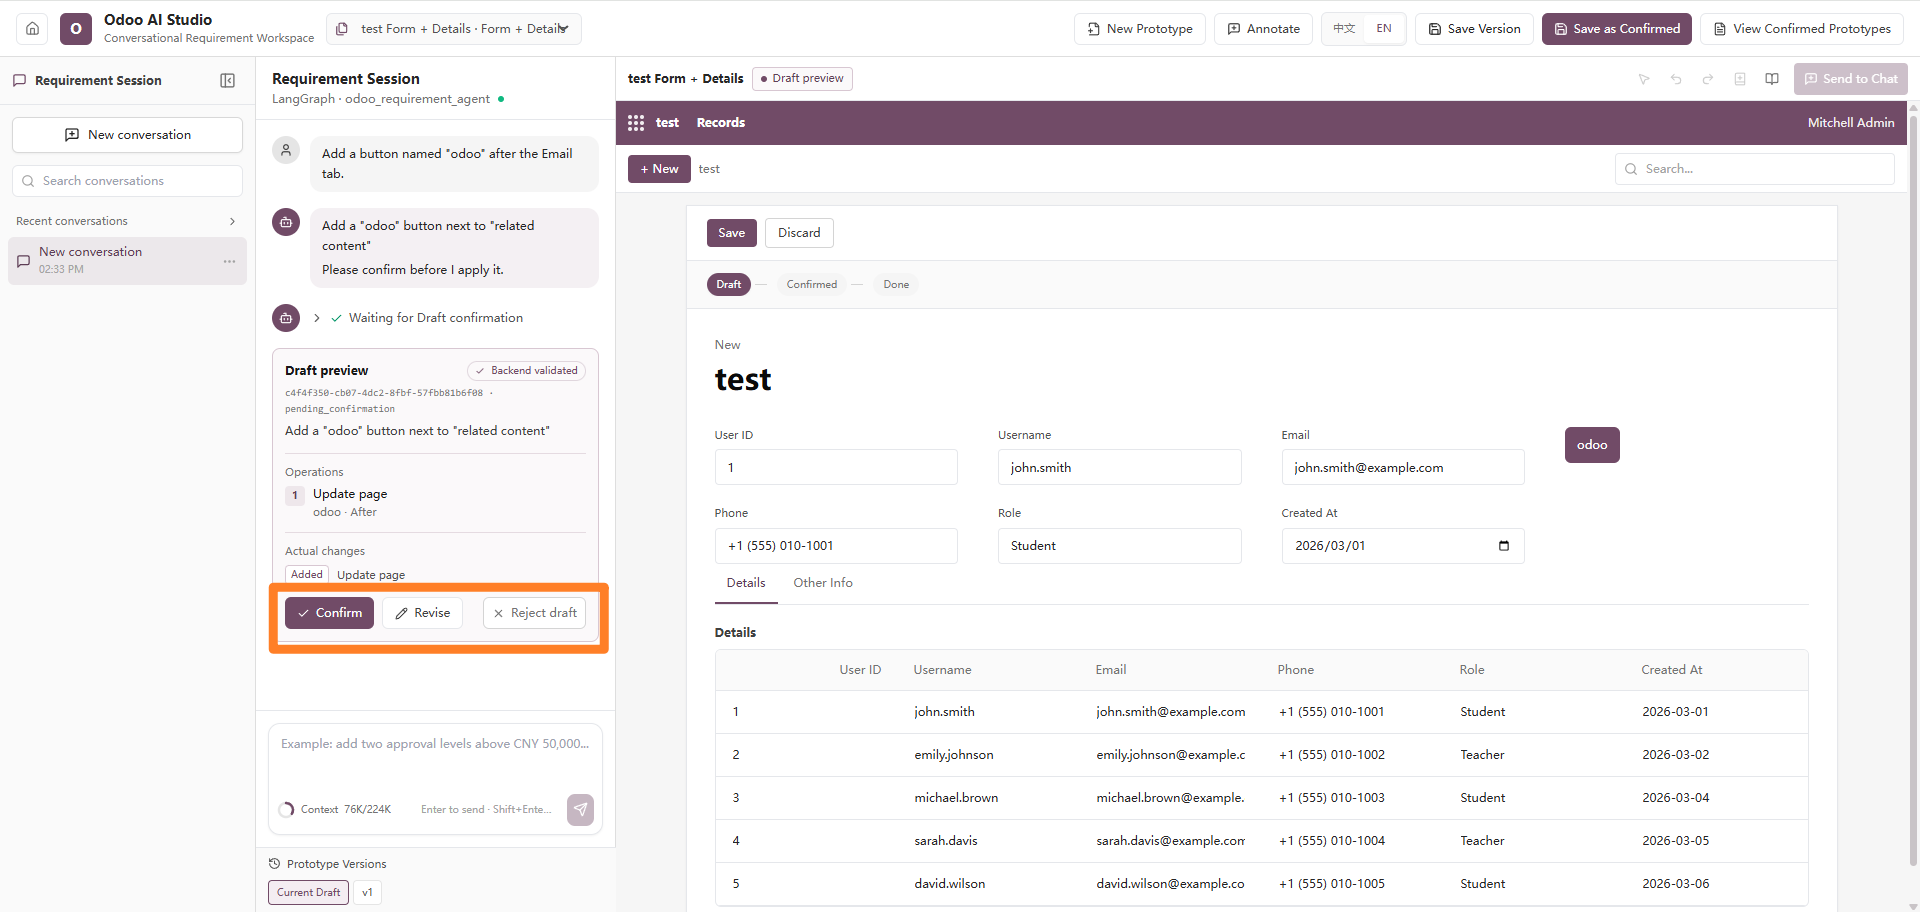
After Odoo AI Studio generates a modification, you can review the result and decide whether to accept it.
You may also continue chatting with the agent to refine the requirement, correct the result, or request additional changes.
Example Prompt
Review this modification and adjust it where necessary.
Screenshot
4. Change Button Colors
Description
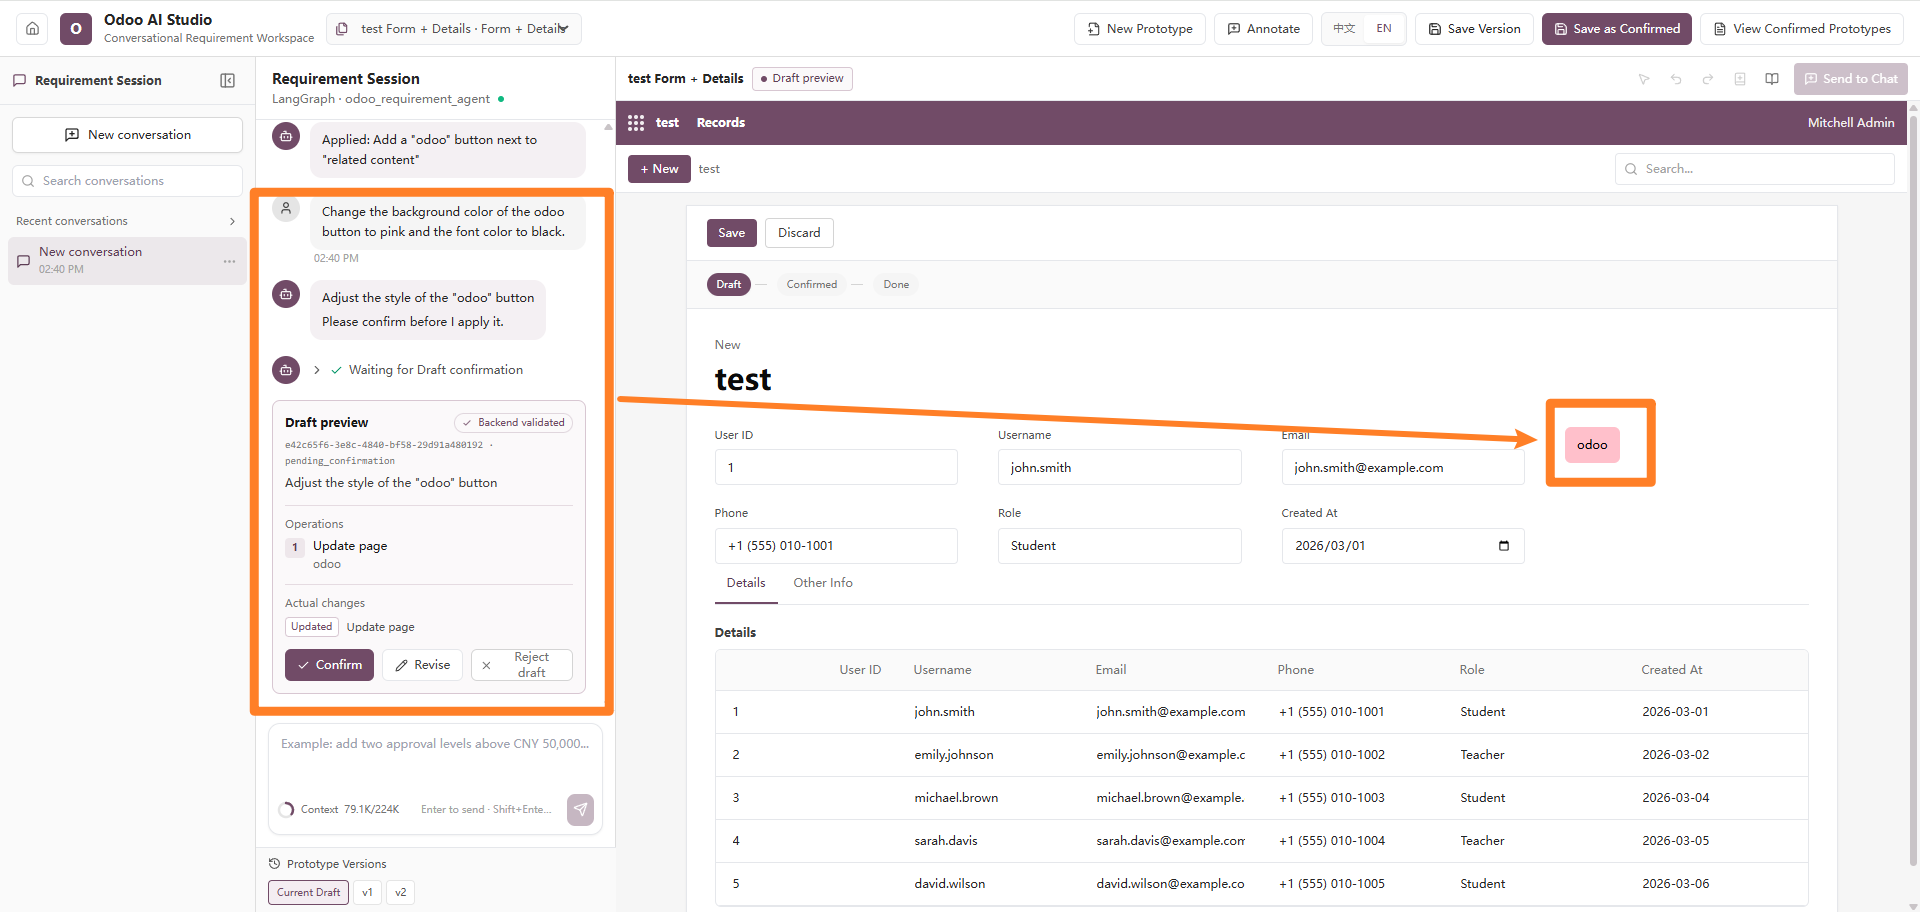
Customize the visual appearance of a button by changing its background color and text color through the chat panel.
These changes affect only the button’s appearance. Its position, label, and functionality remain unchanged.
Example Prompt
Change the background color of the Odoo button to pink and the text color to black.
Screenshot
5. Change a Field’s Text Color
Description
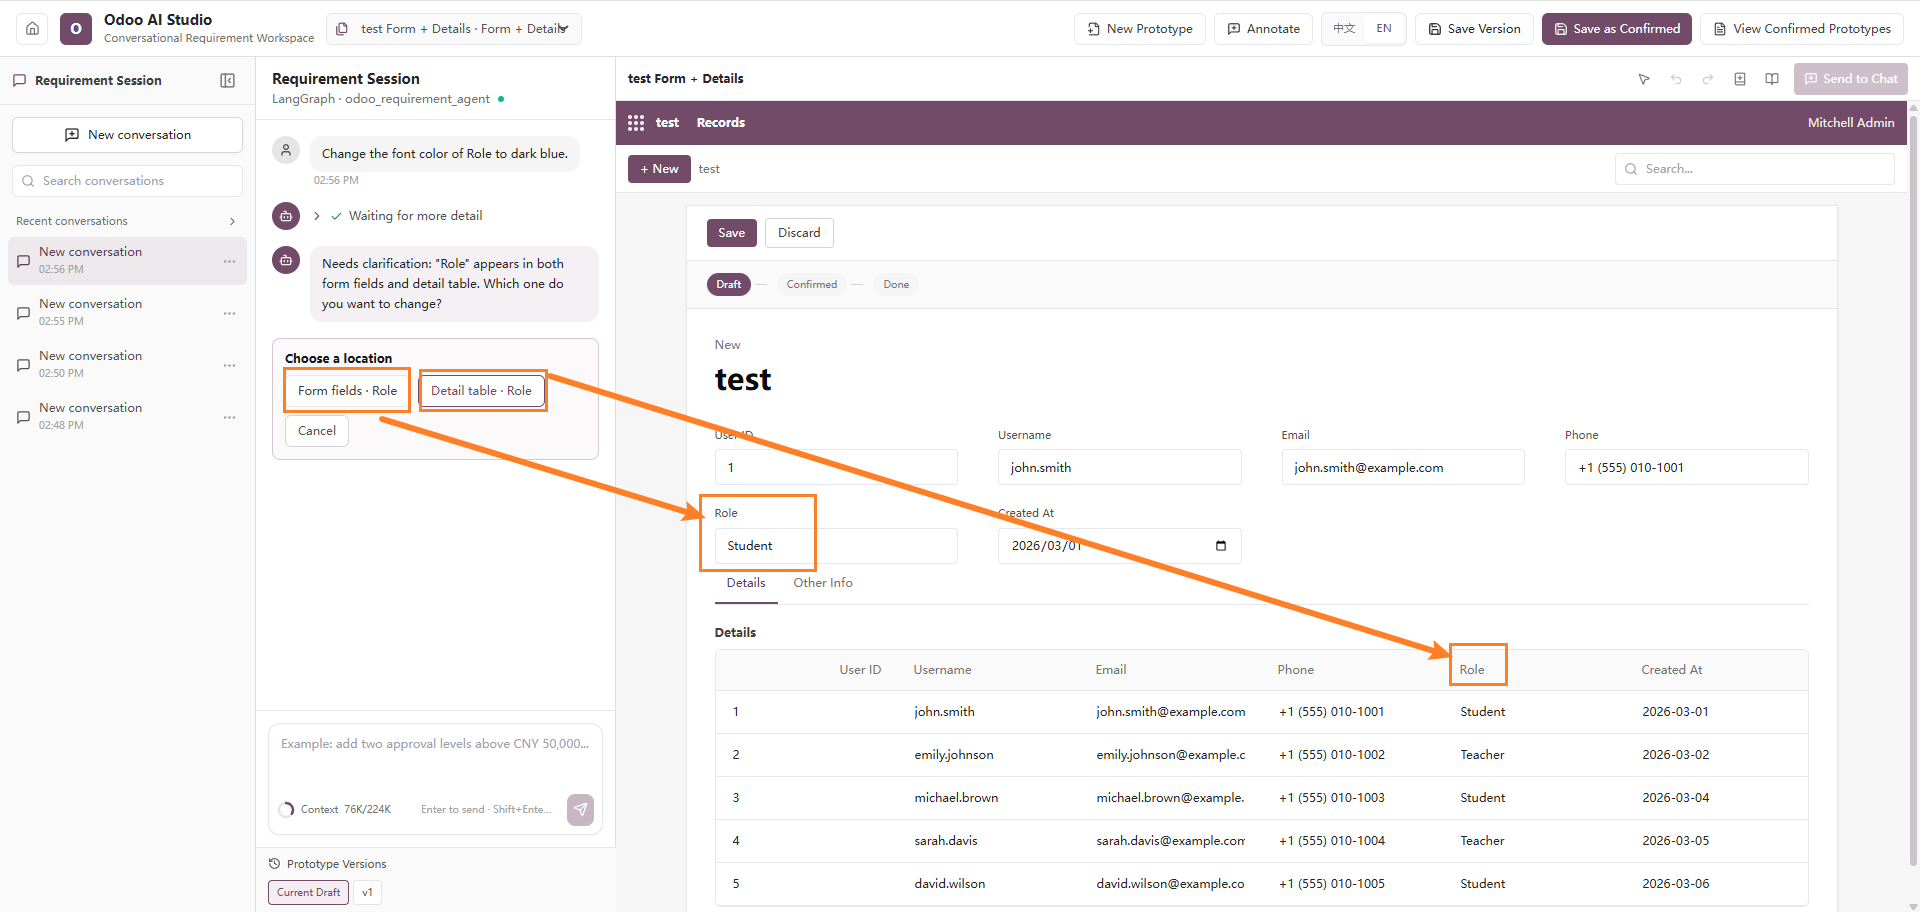
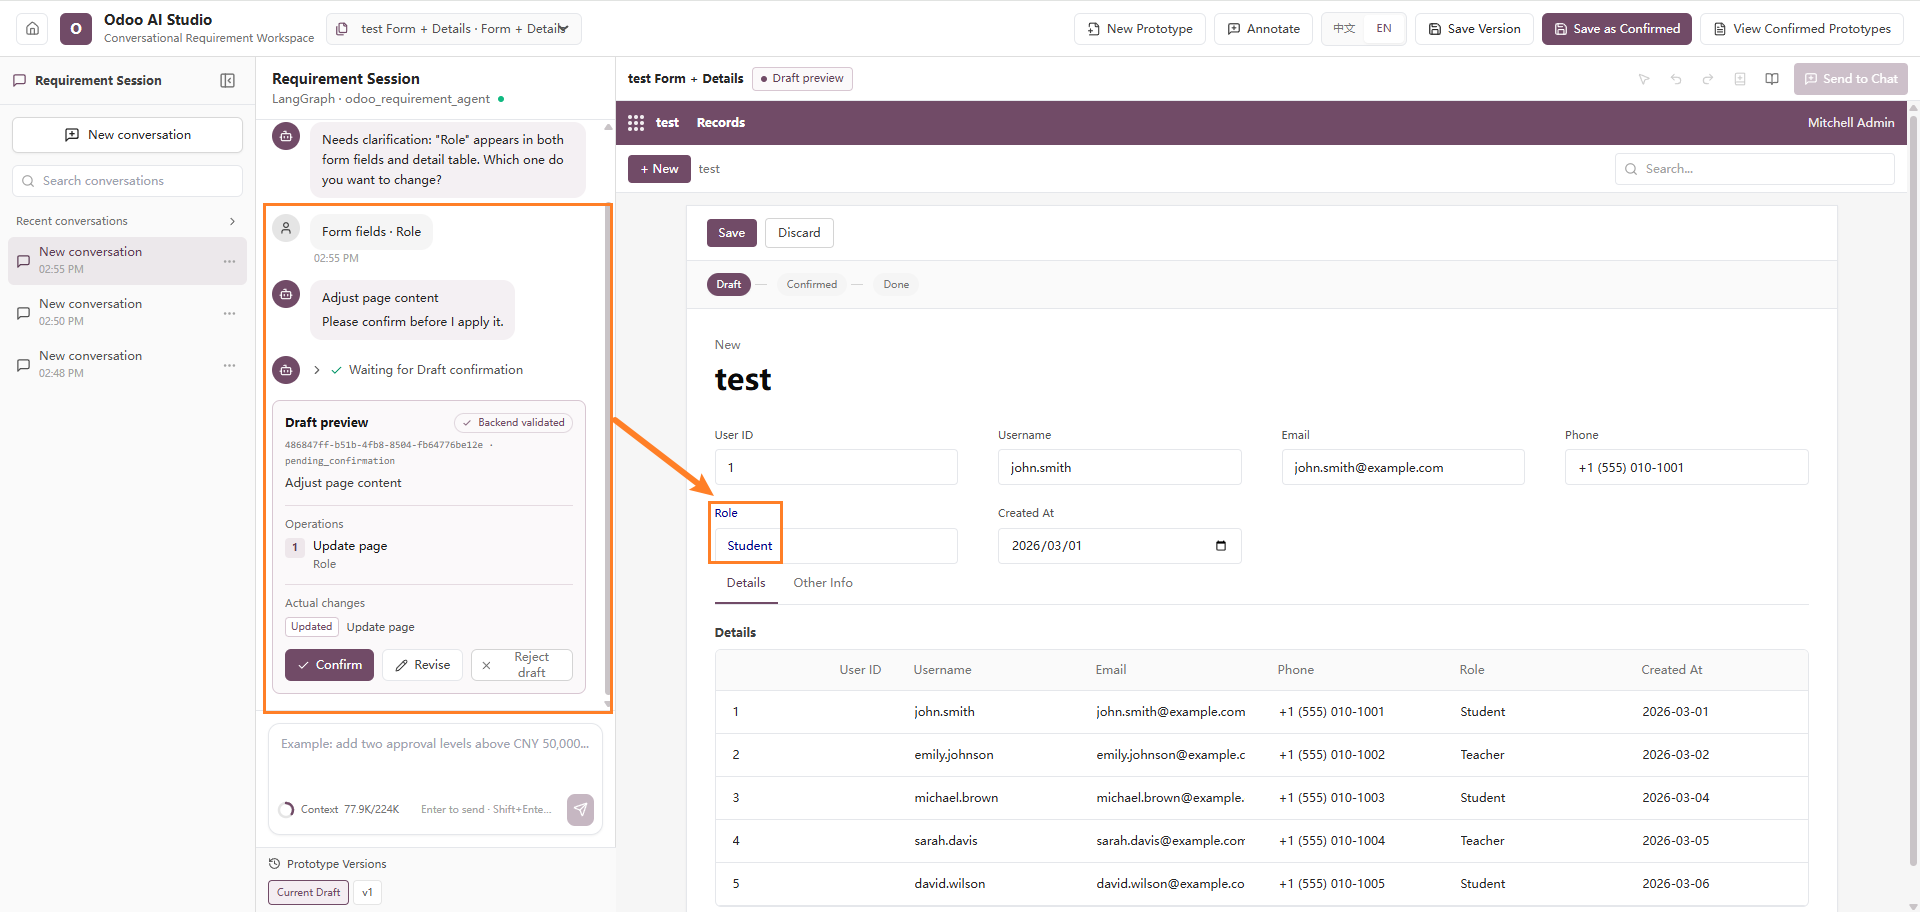
Change the text color of a specific field in a form or detail table.
This feature can be used to highlight important information, distinguish different types of data, or improve the visual hierarchy of the interface.
For more accurate results, clearly identify the field that should be modified.
Example Prompt
Change the text color of the Role field to dark blue.
Screenshots
6. Change a Field’s Font Size
Description
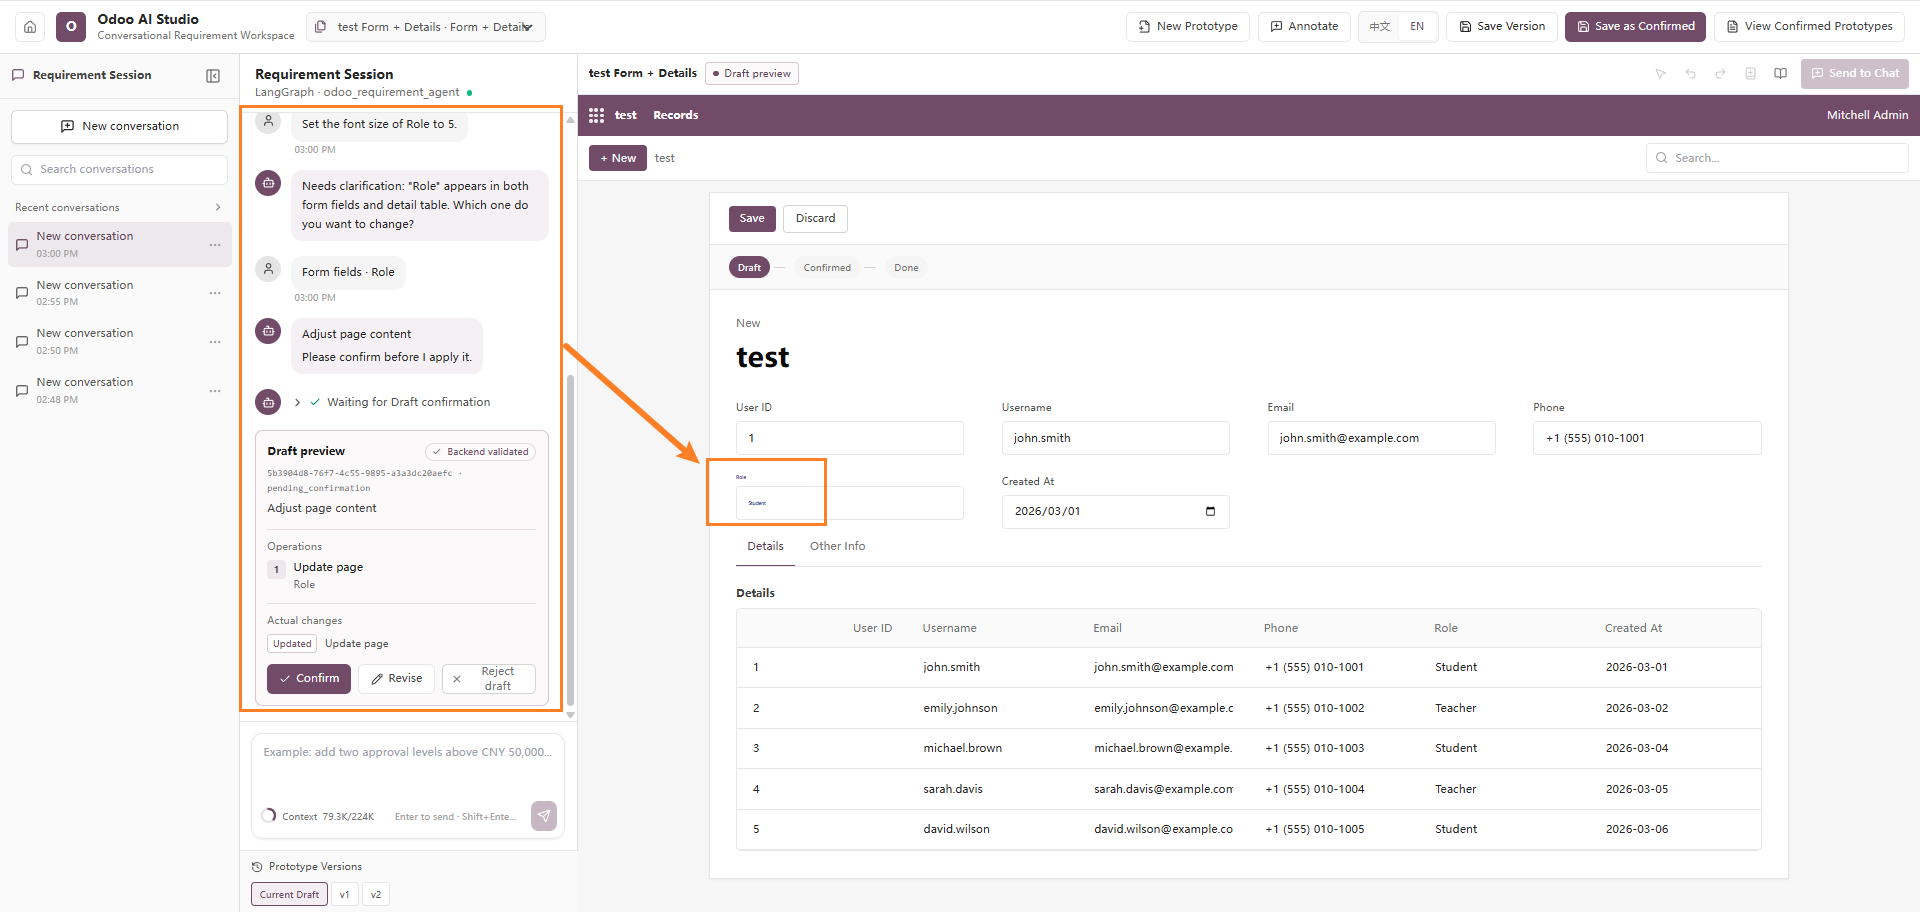
Adjust the font size of a specific field to make important information more prominent or improve readability.
This modification changes only the field’s display size and does not affect its value or business logic.
Example Prompt
Set the font size of the Role field to 15 pixels.
Screenshot
7. Add a Statistical Counter
Description
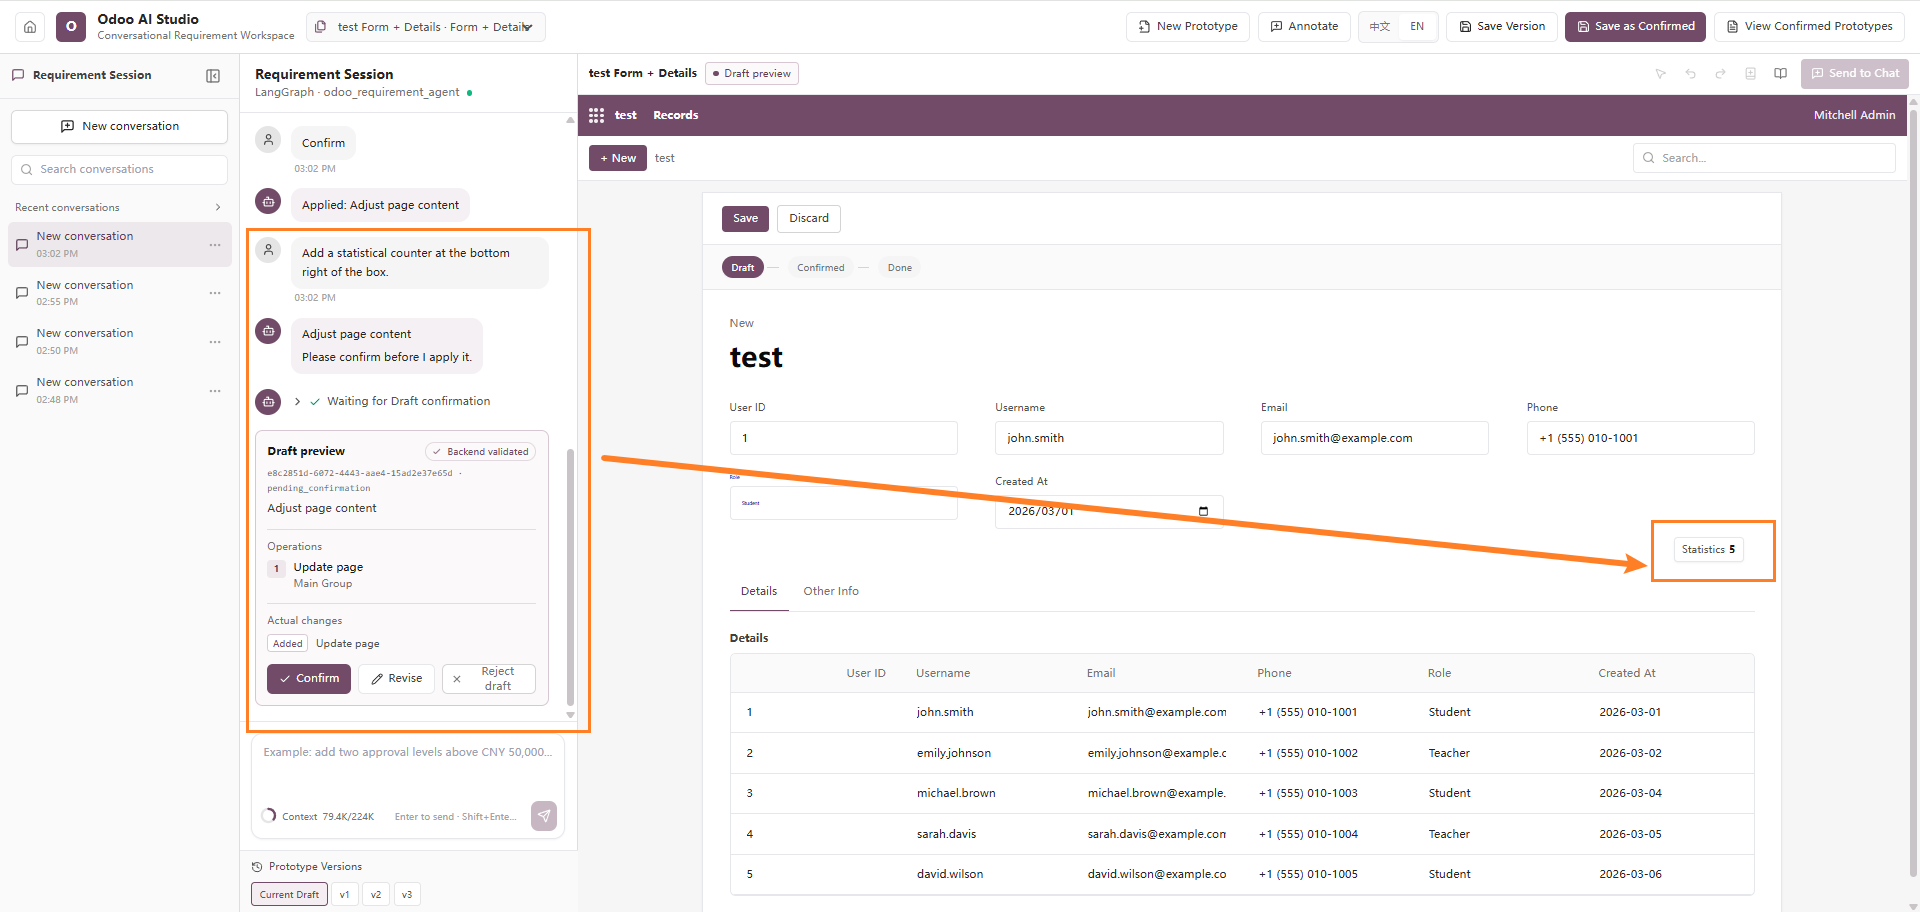
Add a statistical counter to the bottom-right corner of a form section or interface panel.
The counter can display information such as:
- Total record count
- Total quantity
- Total amount
- Other key statistical indicators
The counter remains in a stable position so that users can easily view the latest statistical result.
Example Prompt
Add a statistical counter to the bottom-right corner of the box.
Screenshot
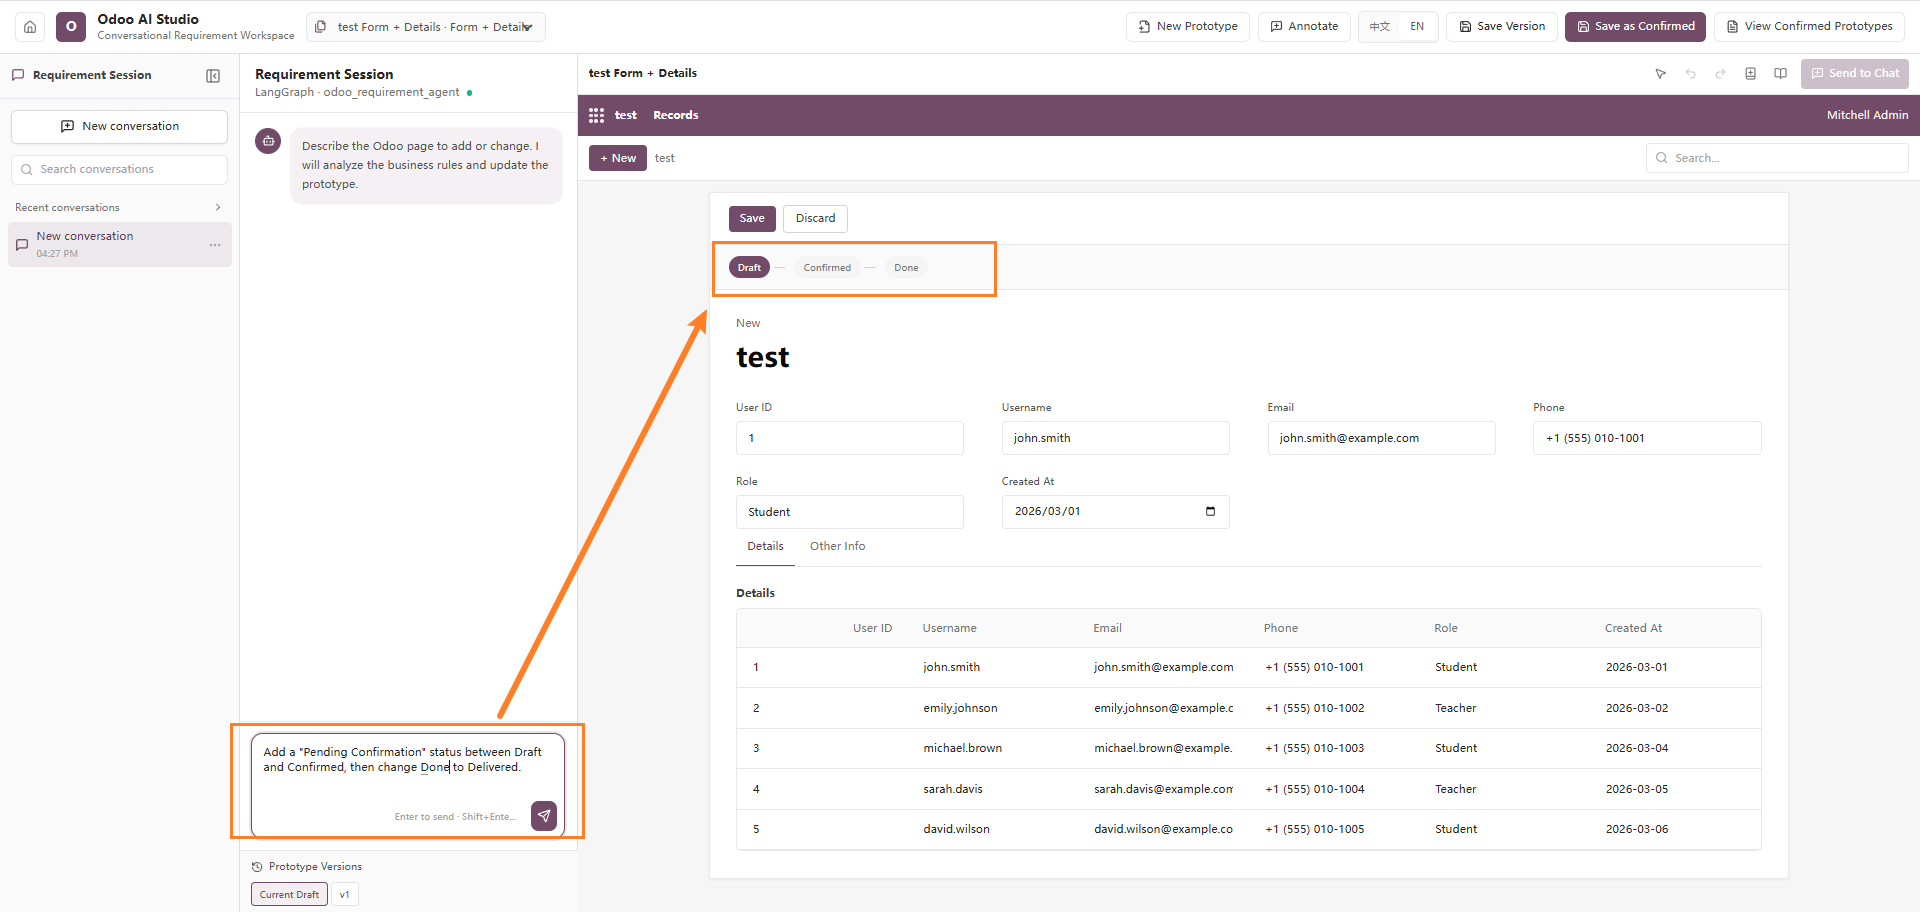
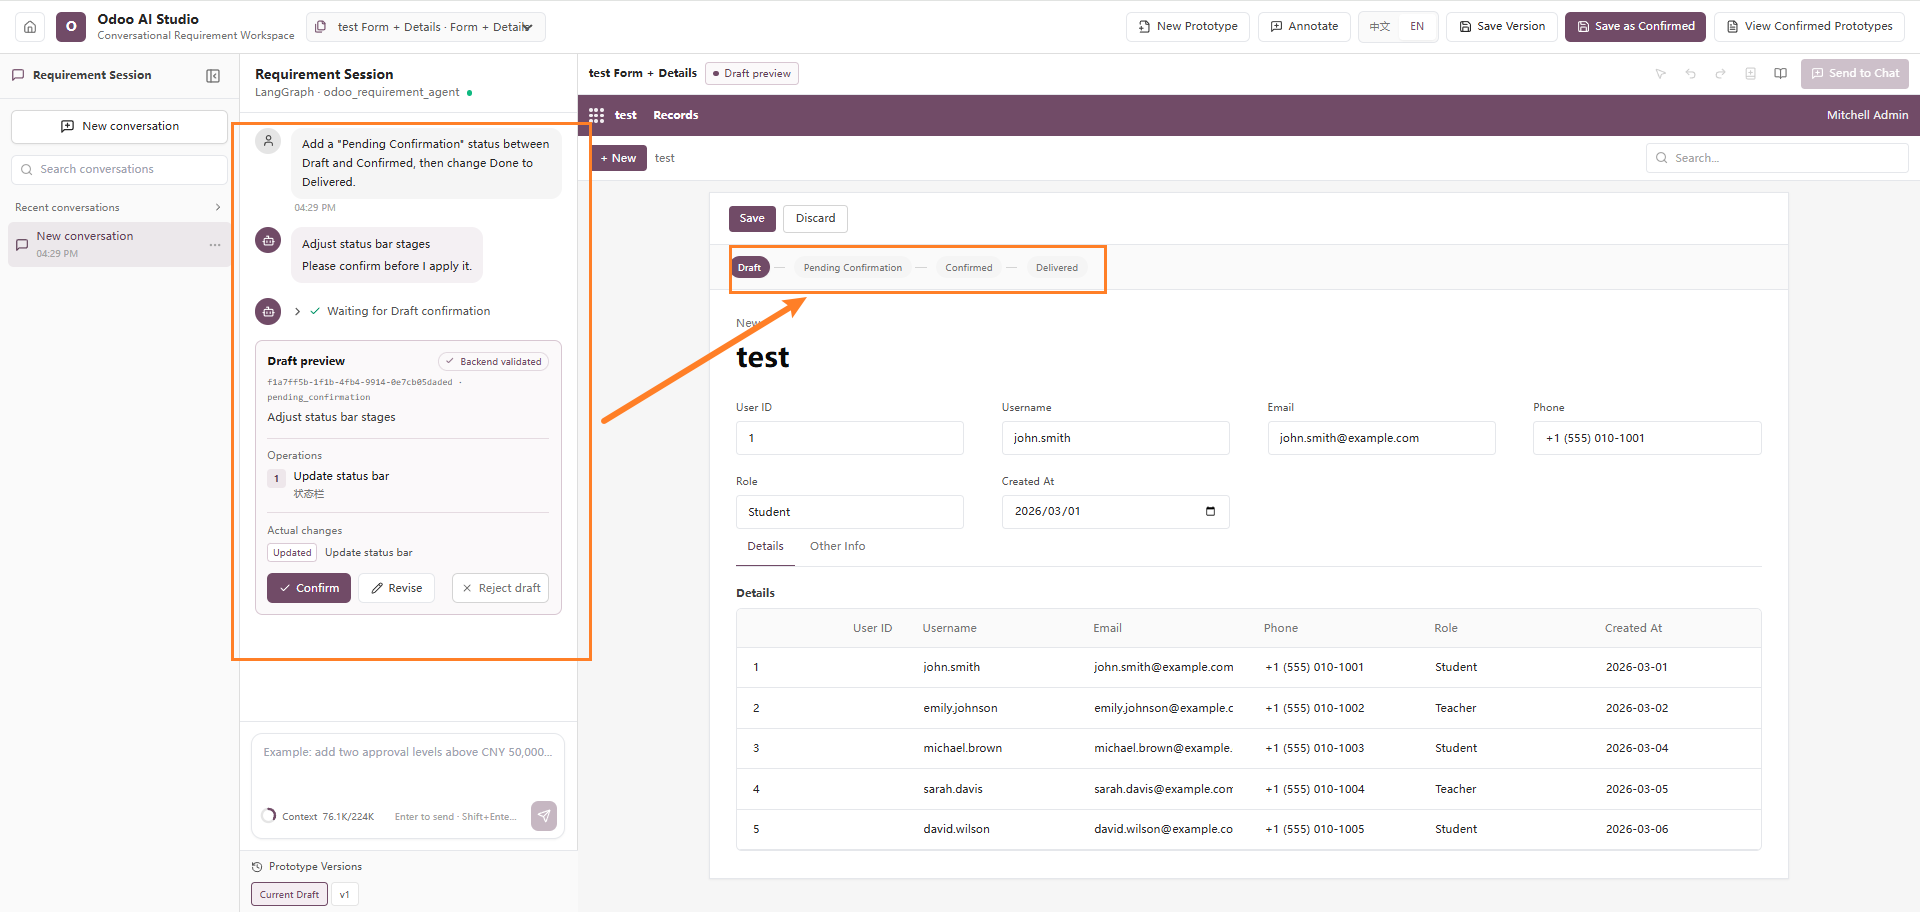
8. Add a Status Bar
Description
Add a status bar at the top of the interface to display information about the current page, record, or operation.
The status bar can be used to show:
- Loading status
- Record count
- Processing progress
- Validation messages
- Operation instructions
The status bar remains in a fixed position and does not interfere with the main content layout.
Example Prompt
Add a “Pending Confirmation” status between Draft and Confirmed, then change Done to Delivered..
Screenshots
9. Reorder Columns in a Detail Table
Description
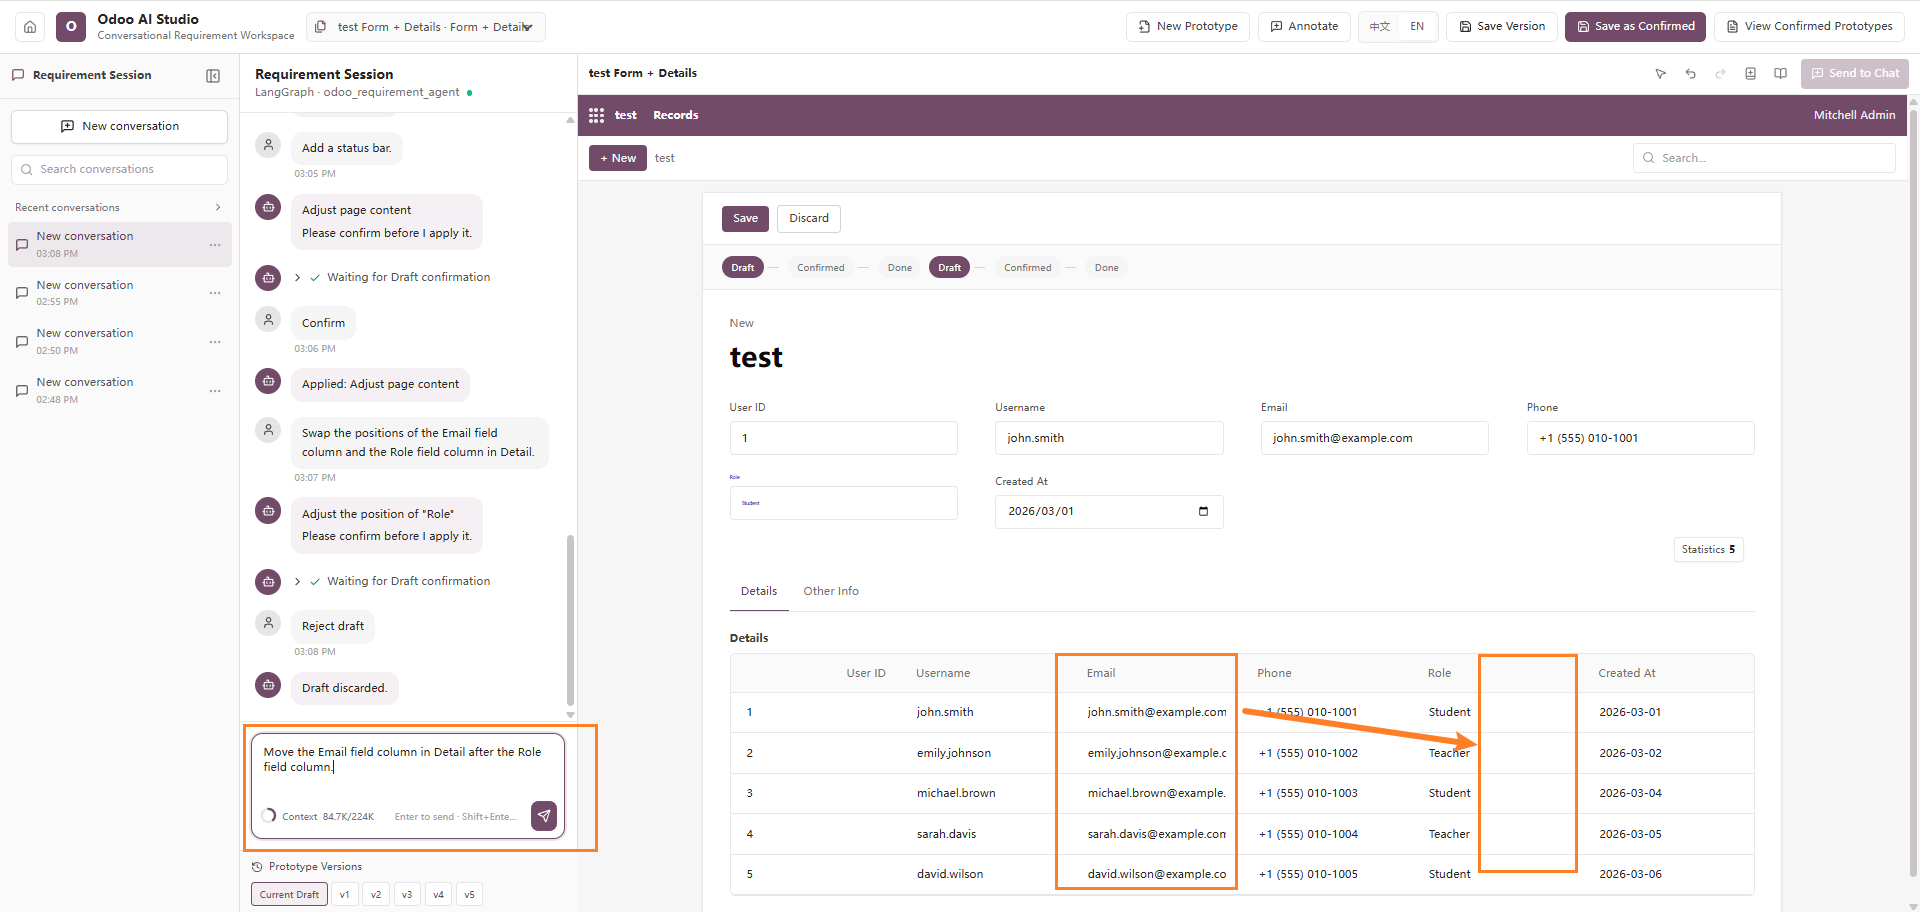
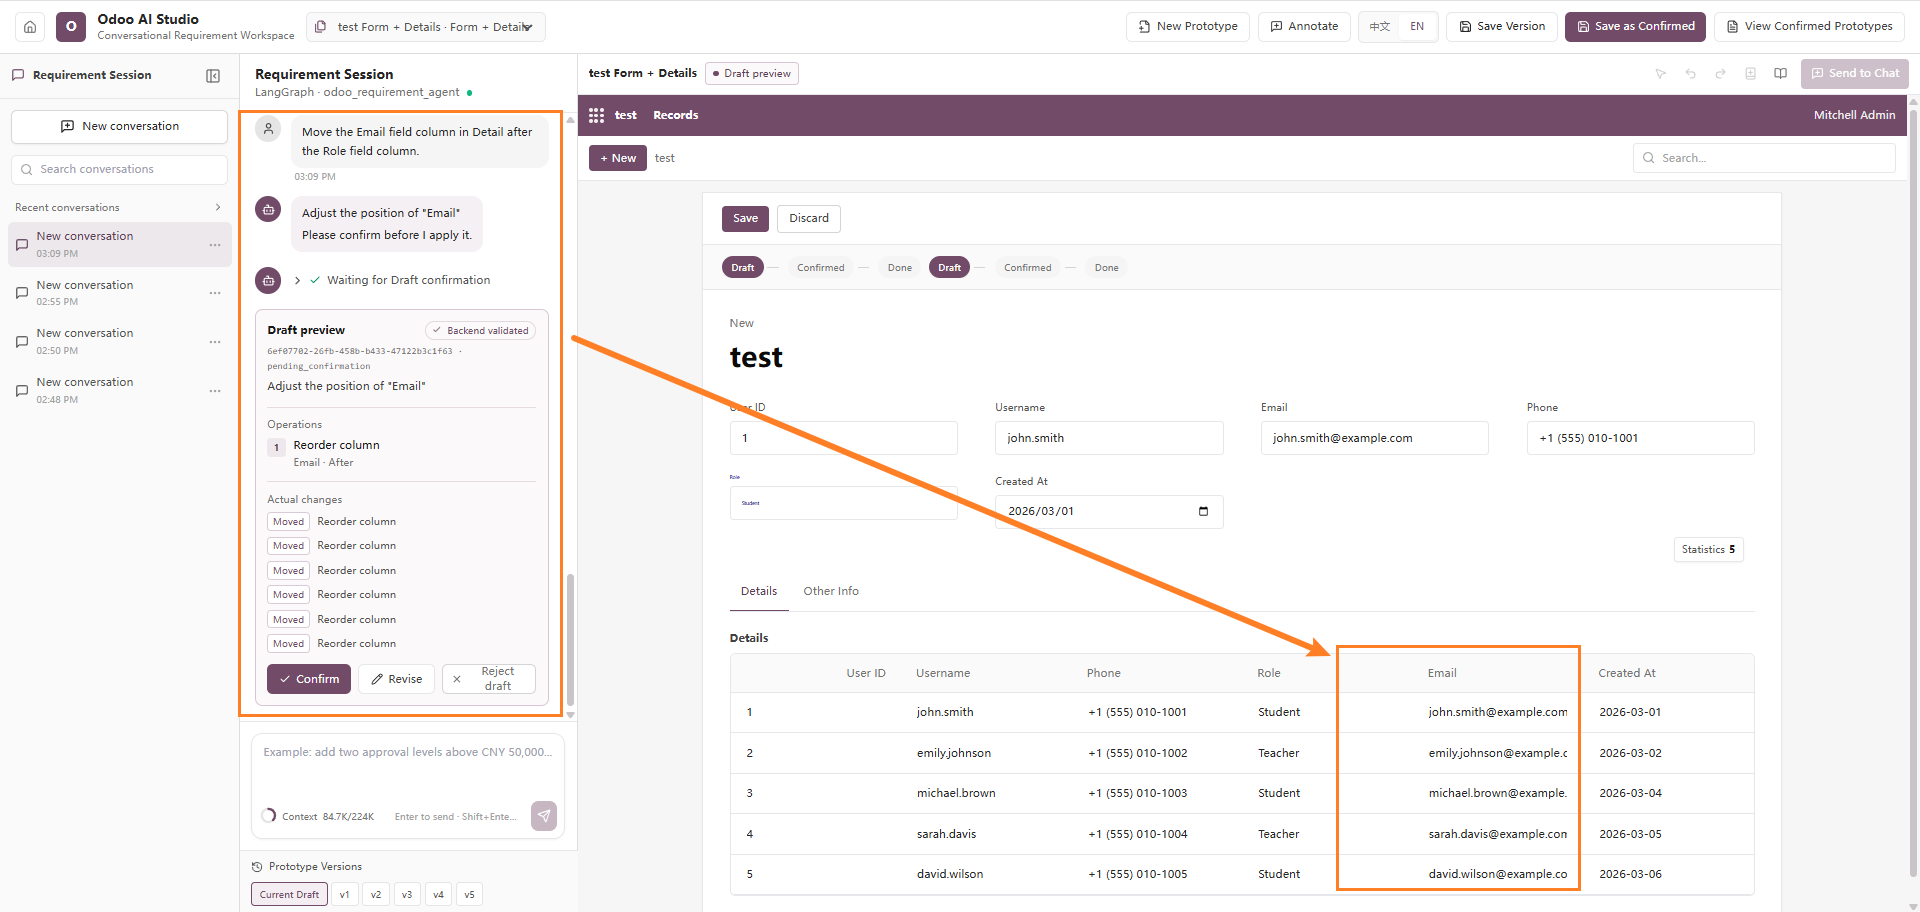
Change the display order of columns in a detail table so that the table better matches the user’s business workflow.
This operation changes only the column order. It does not modify field values, field definitions, or stored data.
Example Prompt
Move the Email column in the Detail table after the Role column.
Screenshots
10. Add a Statistics Row to a Detail Table
Description
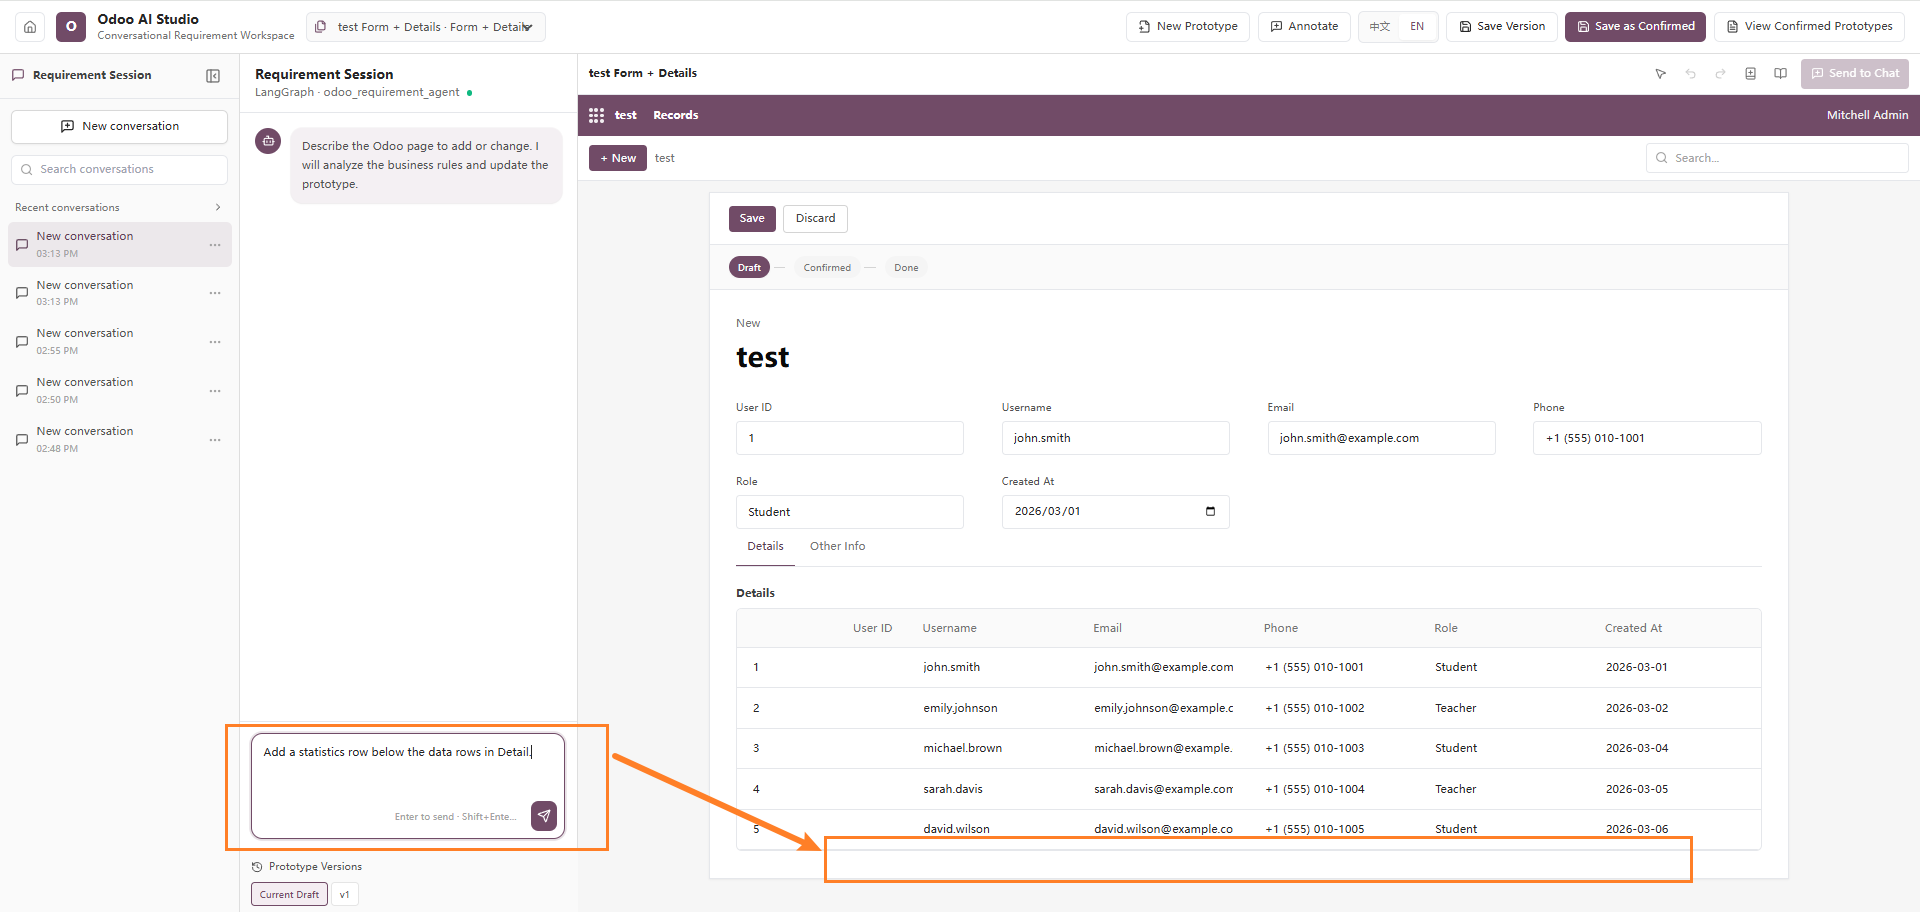
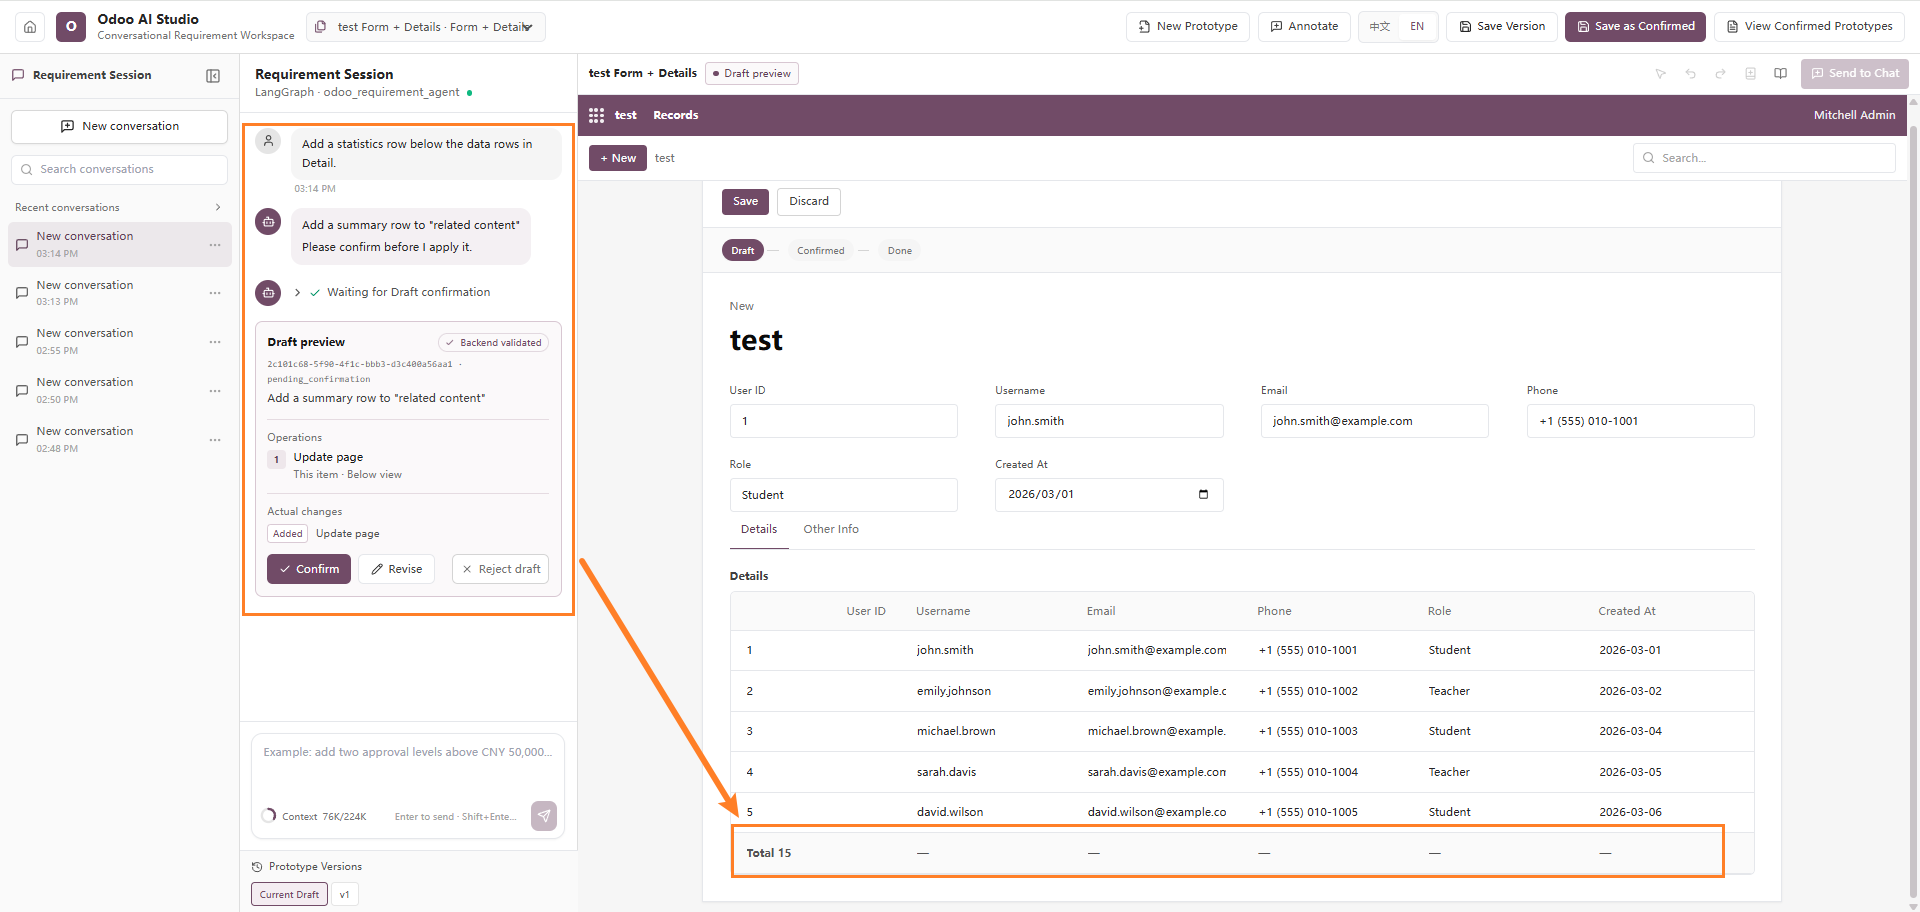
Add a statistics row below the data rows in a detail table.
The statistics row can display totals, averages, counts, or other calculated values for relevant columns. It updates dynamically when the table data changes.
To improve readability, the statistics row should be visually distinguishable from standard data rows.
Example Prompt
Add a statistics row below the data rows in the Detail table.
Screenshots
11. Change the Color of a Table Column
Description
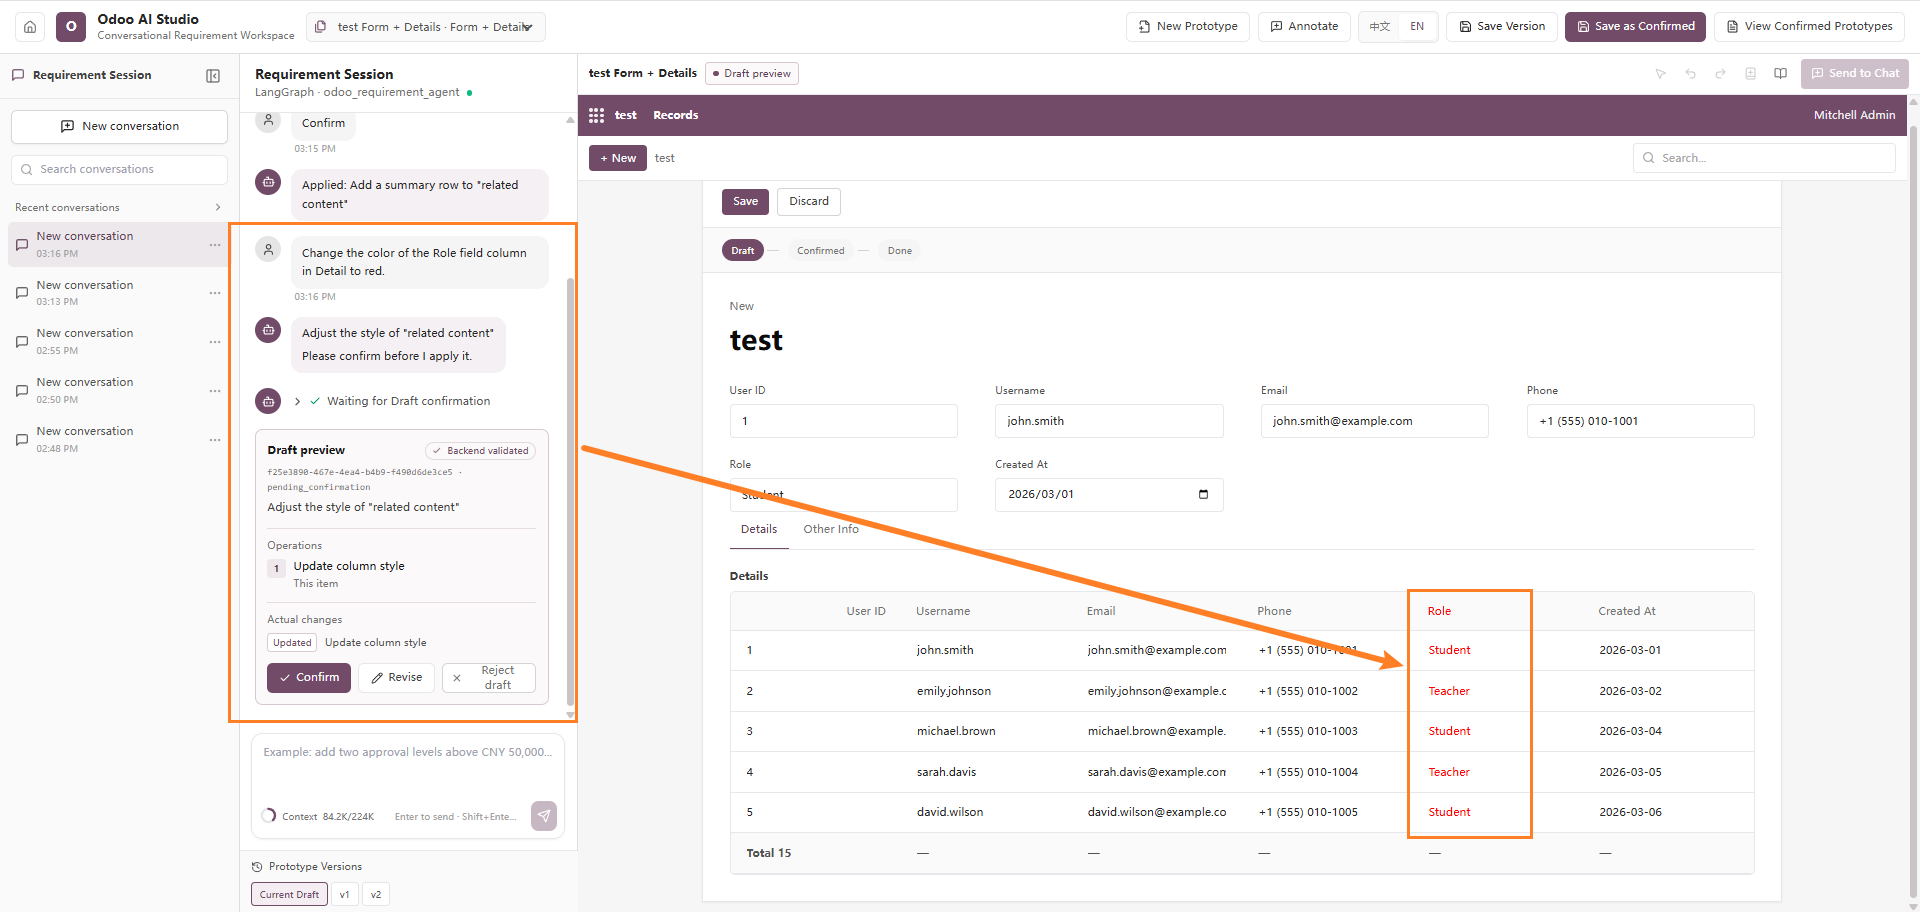
Change the color of an entire column in a detail table, including the column header and its corresponding data cells.
This feature can be used to highlight important business information, identify specific data categories, or draw attention to critical fields.
The modification affects only the visual appearance of the column. It does not change the field values or table structure.
Example Prompt
Change the Role column in the Detail table to red.
Screenshot
12. Rename a Field in a Detail Table
Description
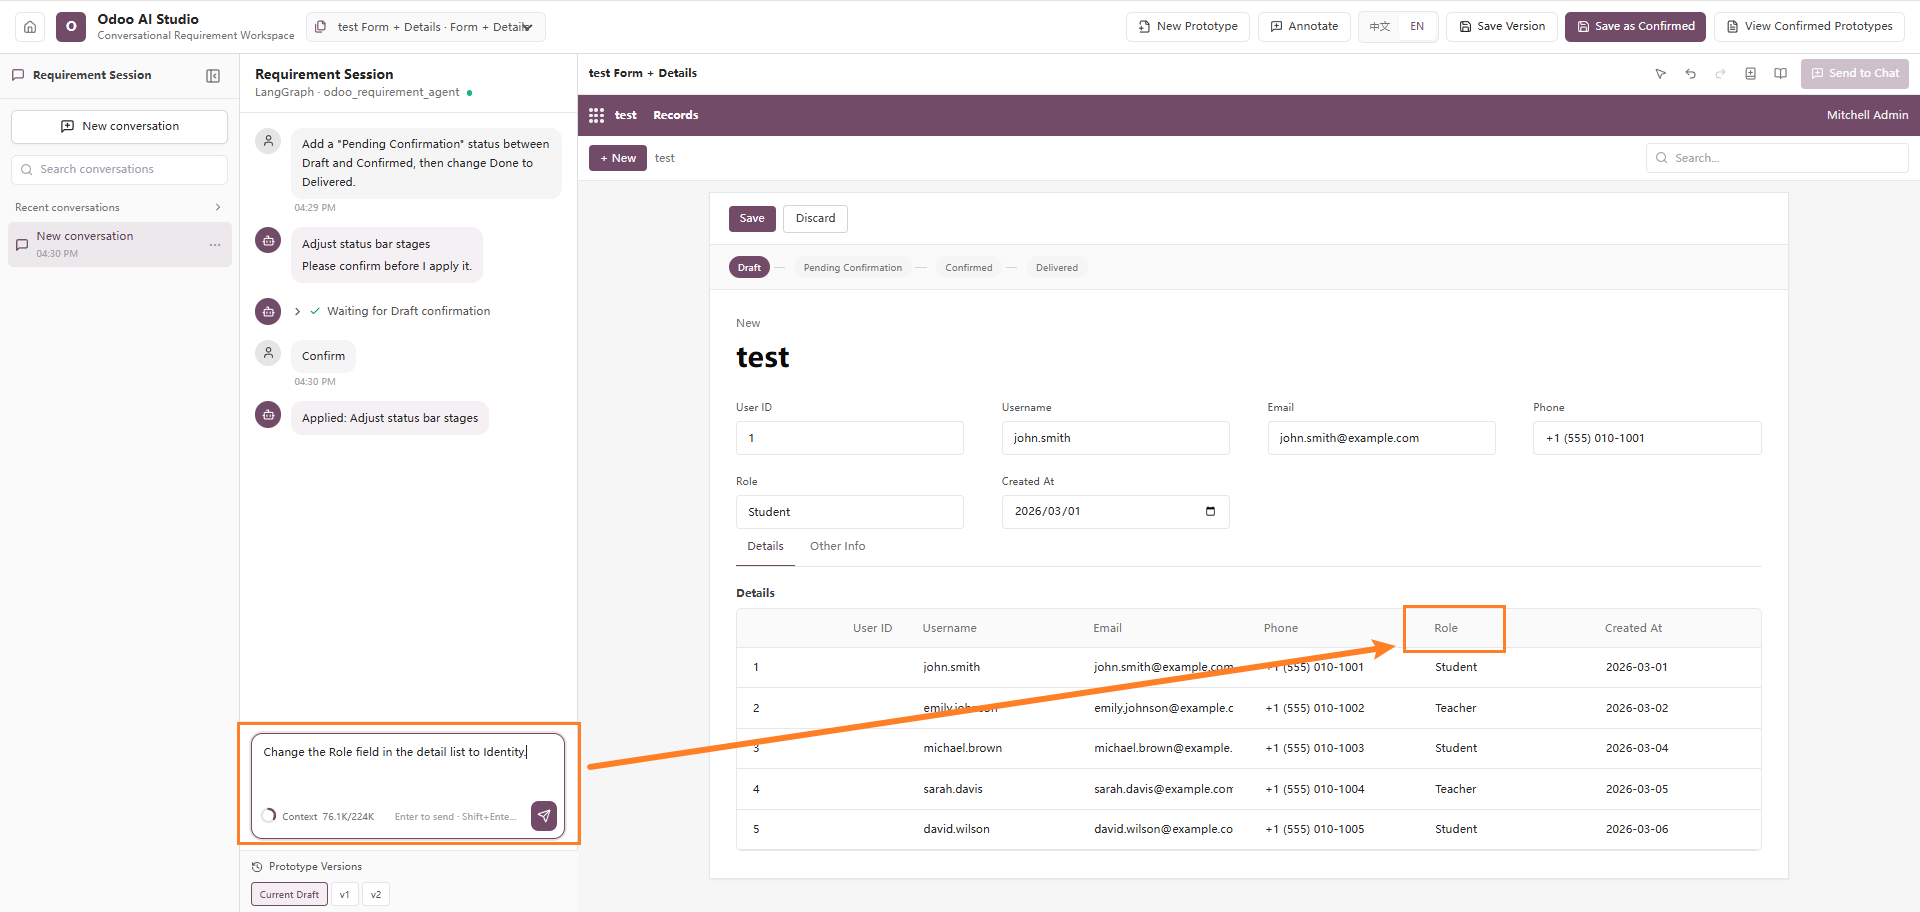
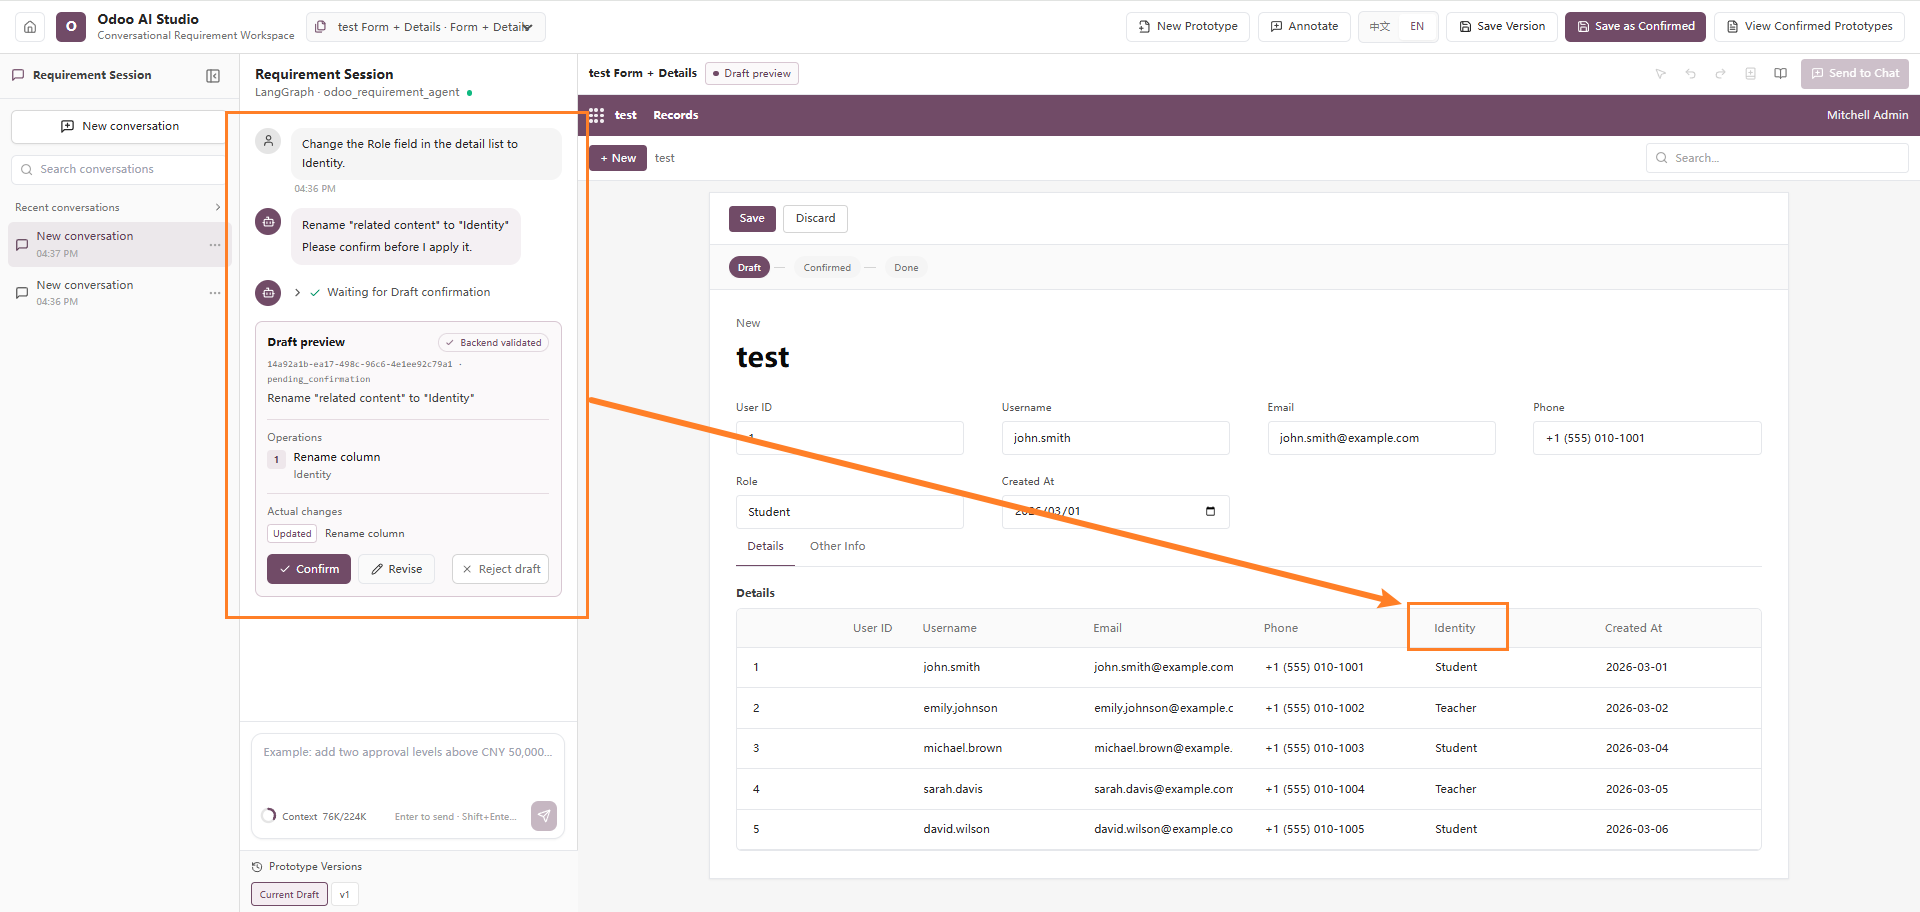
Rename a field in a detail table and update its displayed content. For example, change the Role field to Identity so that the field name better matches the current business semantics.
This modification updates the field label, column header, and related display locations together, while keeping the column order, data type, and table structure unchanged.
Example Prompt
Change the Role field in the Detail list to Identity.
Screenshot
13. Change the Header Color of a Column
Description
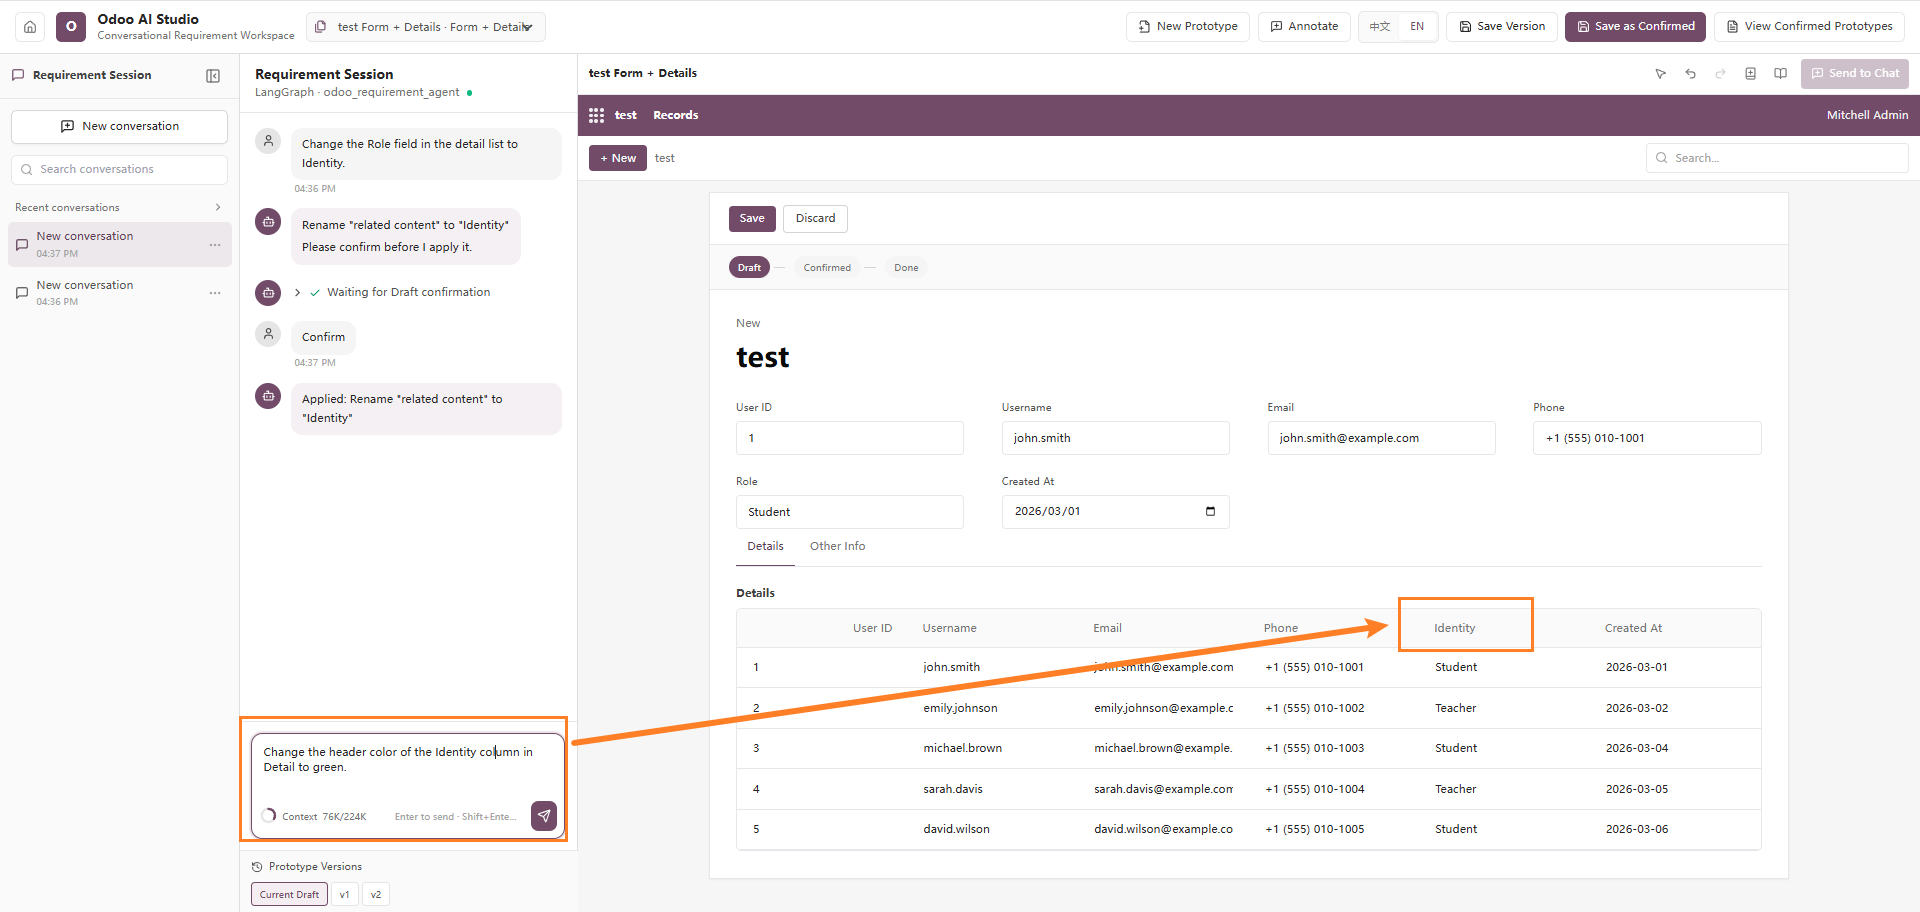
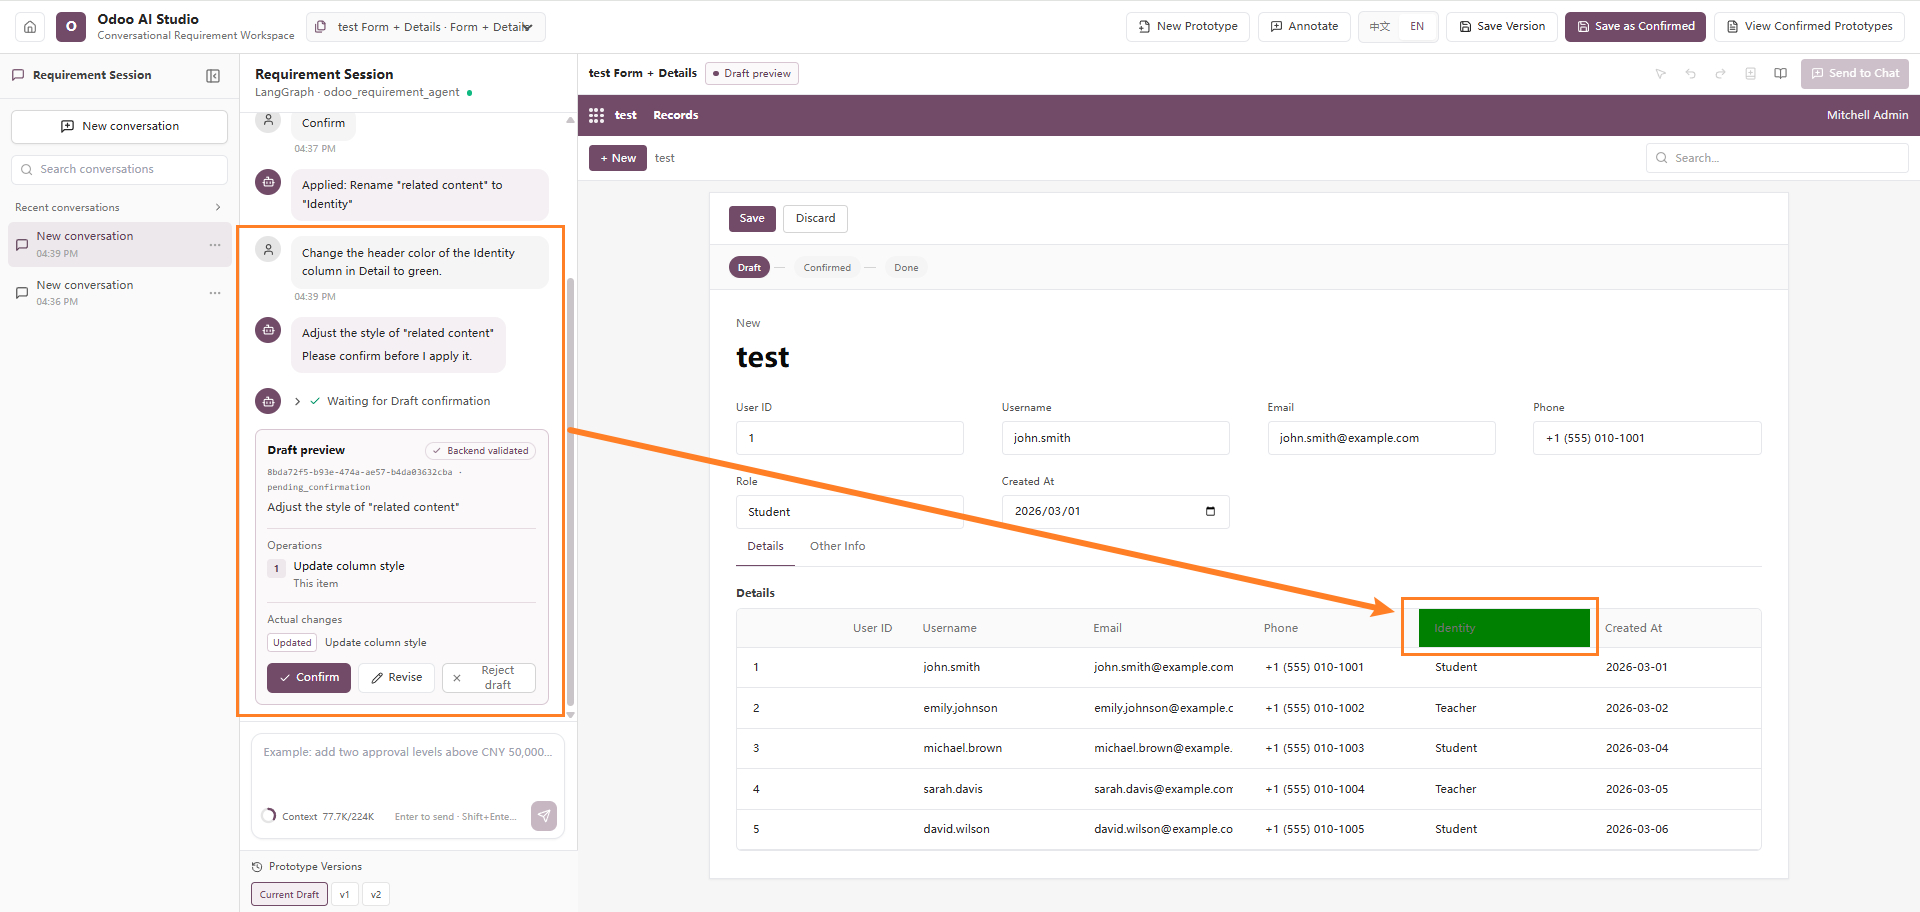
Change the color of a column header in a detail table, for example changing the Identity column header to green to highlight the column or mark a specific business status.
This modification affects only the header color. It does not change the header text, field values, column width, or the overall table structure.
Example Prompt
Change the header color of the Identity column in the Detail table to green.
Screenshot
Tips for Writing Effective Prompts
For more accurate modifications, include the following information in your prompt:
-
Target component
Specify the field, button, table, column, tab, or panel you want to modify. -
Requested action
Clearly state whether you want to add, remove, move, resize, recolor, or reorder the component. -
Target position
Use clear descriptions such as “after the Role field,” “at the top of the page,” or “in the bottom-right corner.” -
Display properties
When changing the appearance, specify the desired color, font size, label, width, or alignment. -
Expected behavior
For buttons, counters, and status bars, describe what information they should display or what action they should trigger.
Recommended Prompt Format
[Action] + [Target component] + [Position or style] + [Expected behavior]
Example
Add a button named Approve after the Status field and use it to trigger the approval workflow.
Writing Style Recommendations
For consistency throughout the manual:
- Use Example Prompt instead of mixing “Example Question” and “Example Query.”
- Use text color rather than “font color” when referring specifically to color.
- Use consistent capitalization for field names, button names, table names, and tabs.
- Use numbered sections so users can quickly locate a function.
- Place each screenshot immediately after its related example prompt.